Lachha Paratha One Cut Trick
Crispy Lachha Paratha is a delicious Indian flatbread known for its beautiful, flaky layers and golden, crispy texture. This easy homemade Lachha Paratha recipe uses whole wheat flour (atta), ghee, and a simple cutting and folding technique to create restaurant-style layered parathas.
If you’ve ever struggled to make perfectly layered Lachha Paratha at home, this recipe is for you! With a clever dough-stacking method and a quick refrigeration trick, you can make crispy, flaky parathas without complicated folding.
Serve these homemade parathas hot with your favorite curry, dal, vegetable dish, or yogurt.
Lachha Paratha One Cut Trick
Why You’ll Love This Lachha Paratha Recipe
- Simple ingredients: Made with basic pantry ingredients, including whole wheat flour, salt, water, and ghee.
- Beautiful flaky layers: A special stacking and cutting technique creates distinct layers.
- Easy folding method: No complicated pleating is required.
- Helpful refrigeration trick: Chilling the stacked dough helps keep the layers separate while rolling.
- Perfect with curries: Delicious for breakfast, lunch, or dinner.
Aloo Keema Recipe Pakistani: English – Urdu
What Is Lachha Paratha?
Lachha Paratha is a traditional Indian layered flatbread made by rolling, folding, and cooking dough with ghee or oil.
The word “lachha” refers to the visible layers that give this paratha its signature flaky texture.
Unlike regular chapati or roti, Lachha Paratha has multiple thin layers that become crispy on the outside while remaining soft and tender inside.
Keto Beef Nihari Recipe
In this recipe, we’re using an easy stacking and cutting method to achieve those beautiful layers with minimal effort.
Ingredients for Lachha Paratha
Servings: 5 parathas
For the Dough
- 3 cups whole wheat flour (atta)
- 1 teaspoon salt
- 1½ cups warm water
For Layering and Cooking
- Ghee, as needed
How to Make Crispy Lachha Paratha (Step-by-Step)
Step 1: Prepare the Dough
In a large mixing bowl, add the whole wheat flour and salt.
Gradually pour in the warm water while mixing the flour.
Knead until you have a soft, smooth, and pliable dough.
Cover the dough and let it rest for 15 minutes. This helps relax the gluten, making the dough easier to roll.
Step 2: Divide the Dough
After resting, divide the dough into 6 equal portions.
Shape each portion into a smooth ball.
Cover the dough balls and let them rest for another 5 minutes.
Step 3: Roll into Small Discs
Take one dough ball and roll it into a small, round disc.
Repeat with the remaining dough balls until you have 6 small rotis.
Try to keep them approximately the same size so they stack evenly.
Step 4: Apply Ghee and Stack the Rotis
Spread a thin, even layer of ghee over each roti.
Place the rotis on top of one another to form a stack.
Cover the stacked rotis and place them in the refrigerator for 10 minutes.
Why refrigerate the dough?
This is one of the most important tricks in this recipe!
Chilling helps the ghee firm up between the rotis, making the stacked dough easier to roll without the layers sticking together.
This simple step helps create beautiful, separate layers in the finished paratha.
Step 5: Roll Out the Stacked Dough
Remove the stacked dough from the refrigerator.
Place it on your rolling surface and carefully roll it into a large, thin circle.
Use firm, even pressure while rolling, taking care not to press the layers together excessively.
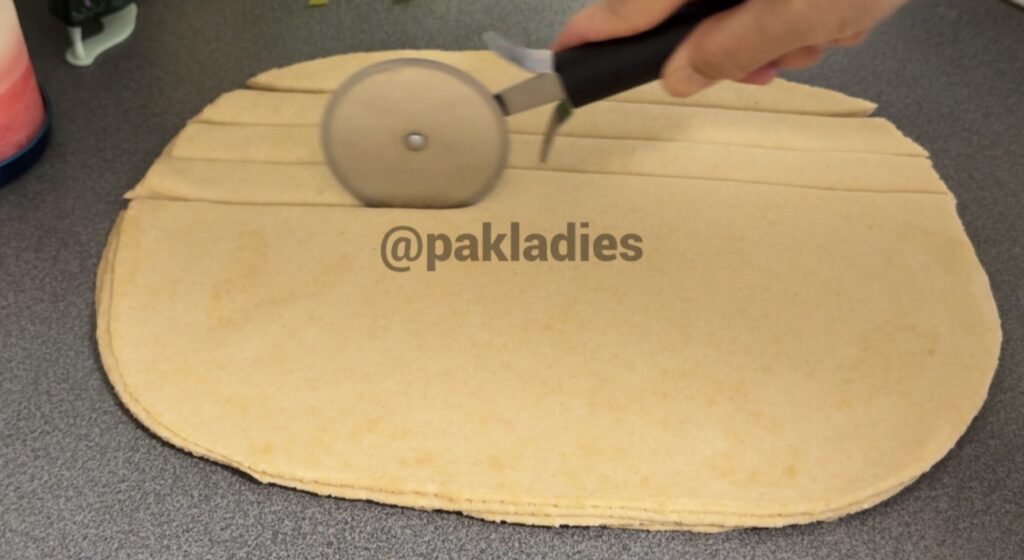
Step 6: Cut and Shape the Layers
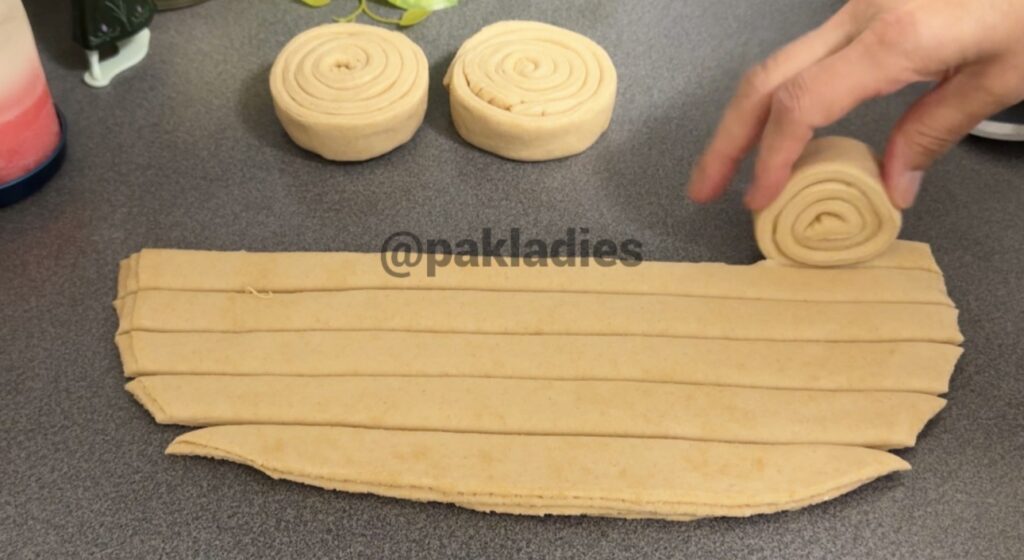
Using a knife or pizza cutter, cut the rolled dough into strips.
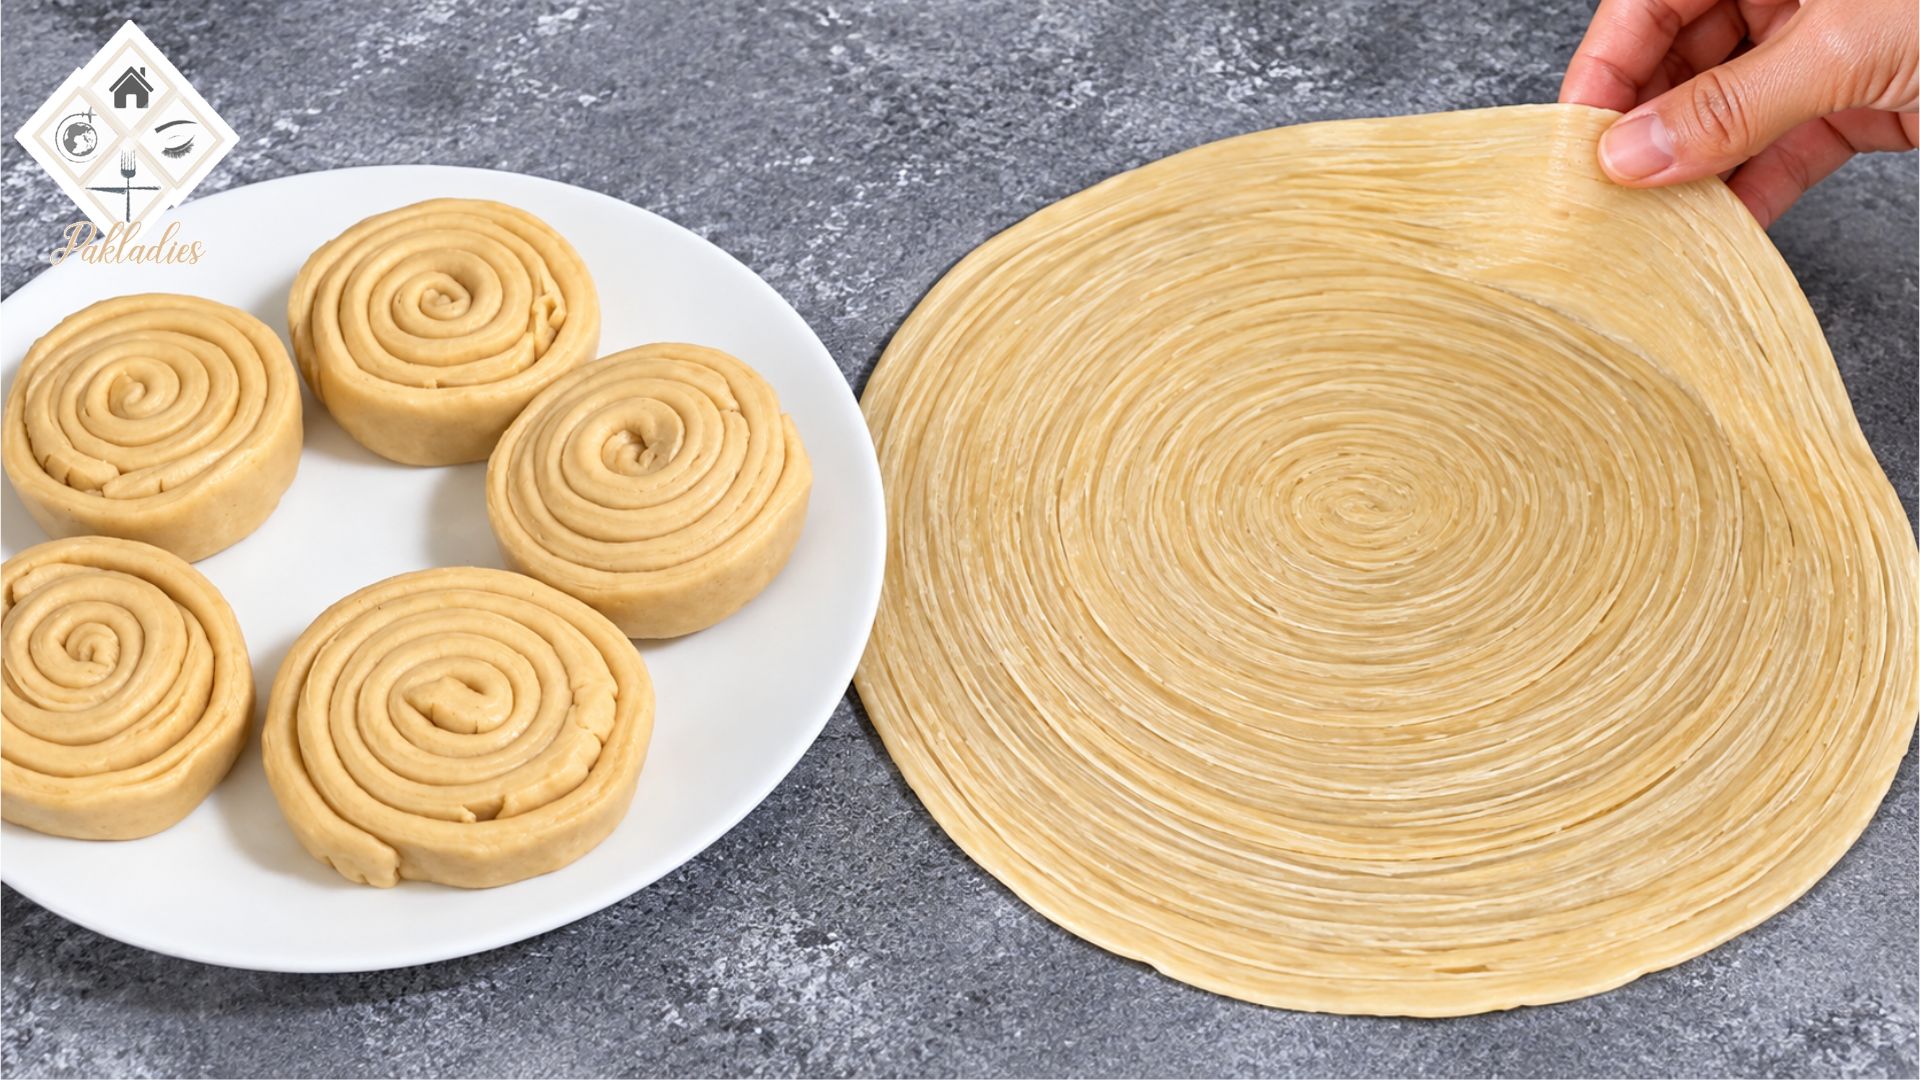
Roll and fold the strips into wheel-like spiral shapes.
This easy cutting and folding technique creates multiple layers without traditional pleating.
You should get approximately 5 portions from the prepared dough.
Cover the shaped dough portions and allow them to rest for 15 minutes.
Step 7: Roll the Parathas
Take one spiral-shaped dough portion and gently flatten it.
Using a rolling pin, carefully roll it into a round paratha.
Avoid applying too much pressure, as this may compress the delicate layers.
Repeat with the remaining portions.
Step 8: Cook the Lachha Paratha
Heat a tawa or flat skillet over medium heat.
Place one rolled paratha onto the hot tawa.
Cook until small bubbles and light golden spots begin to appear.
Flip the paratha and apply ghee.
Continue cooking, flipping as needed and applying ghee, until both sides are golden brown and crispy.
Repeat with the remaining parathas.
Step 9: Separate the Flaky Layers
Once the paratha is cooked, gently crush it between your hands to loosen and separate the layers.
Be careful, as the paratha will be hot.
This final step reveals the beautiful, flaky layers and gives Lachha Paratha its signature texture.
Serve immediately while hot and crispy!
Tips for Making Perfect Crispy Lachha Paratha
1. Use soft dough. Knead the dough until smooth and pliable. A stiff dough can make the parathas difficult to roll.
2. Don’t skip the resting time. Resting helps relax the dough and makes shaping easier.
3. Apply ghee evenly. Ghee helps separate the dough layers and creates a rich, flaky texture.
4. Refrigerate the stacked dough. Chilling for 10 minutes helps the layers stay distinct during rolling.
5. Avoid excessive pressure. Roll the final parathas gently to preserve the layers.
6. Cook over medium heat. This allows the parathas to cook through while developing a golden, crispy exterior.
7. Separate the layers while warm. Gently crushing the cooked paratha helps reveal its flaky texture.
What to Serve With Lachha Paratha
Crispy Lachha Paratha pairs wonderfully with many Indian dishes, including:
- Paneer Butter Masala
- Dal Makhani
- Chana Masala
- Chicken Curry
- Mixed Vegetable Curry
- Raita or plain yogurt
- Indian pickles and chutneys
Frequently Asked Questions
Can I make Lachha Paratha with whole wheat flour?
Yes! This recipe uses 100% whole wheat flour (atta). It produces delicious, flaky parathas without requiring all-purpose flour.
Why do you refrigerate the dough?
Refrigerating the stacked rotis for 10 minutes helps the ghee firm up, making the layers easier to handle and helping prevent them from sticking together while rolling.
How do I make Lachha Paratha crispy?
Apply ghee between the layers, roll gently, and cook over medium heat with enough ghee to develop a golden, crispy exterior.
Can I prepare the dough in advance?
Yes. You can prepare the dough ahead of time and store it covered in the refrigerator for up to 24 hours. Let it soften slightly before rolling.
How do I reheat Lachha Paratha?
Reheat the paratha on a hot tawa over medium heat until warmed through and crispy again.
What is the difference between Lachha Paratha and regular paratha?
Regular paratha may have a few folded layers, while Lachha Paratha is specially shaped to create multiple thin, visible, flaky layers.
Recipe Card: Crispy Lachha Paratha
Recipe: Crispy Lachha Paratha
Cuisine: Indian
Course: Breakfast, Lunch, Dinner, Side Dish
Yield: 5 parathas
Prep Time: 15 minutes (estimated active preparation)
Resting and Chilling Time: 45 minutes
Cook Time: Approximately 20 minutes
Total Time: Approximately 1 hour 20 minutes
Ingredients
- 3 cups whole wheat flour (atta)
- 1 tsp salt
- 1½ cups warm water
- Ghee for layering and cooking
Instructions
- Mix wheat flour and salt. Gradually add warm water and knead into a soft dough. Cover and rest for 15 minutes.
- Divide into 6 equal portions. Cover and rest for 5 minutes.
- Roll each portion into a small disc.
- Spread ghee on each disc and stack them. Cover and refrigerate for 10 minutes.
- Remove from the refrigerator and carefully roll the stack into a large, thin circle.
- Cut into strips and fold into wheel-like spirals to form approximately 5 portions. Cover and rest for 15 minutes.
- Gently roll each spiral into a paratha.
- Cook on a hot tawa with ghee over medium heat until golden brown and crispy on both sides.
- Gently crush the cooked paratha to separate the flaky layers. Serve hot.
Recipe Notes: The secret to beautiful Lachha Paratha layers is evenly applied ghee, a brief refrigeration period, and gentle rolling. Avoid pressing too hard when shaping the final parathas.
Final Thoughts
Making crispy, restaurant-style Lachha Paratha at home doesn’t have to be difficult!
With this simple dough-stacking method, refrigeration trick, and easy cutting technique, you can prepare beautifully layered, golden, and flaky parathas using just a few everyday ingredients.
Try this homemade Lachha Paratha recipe with your favorite curry, and enjoy every crispy, buttery layer!